Fine-tune your half-kneeling landmine press setup with precise techniques to enhance stability and maximize shoulder gains.
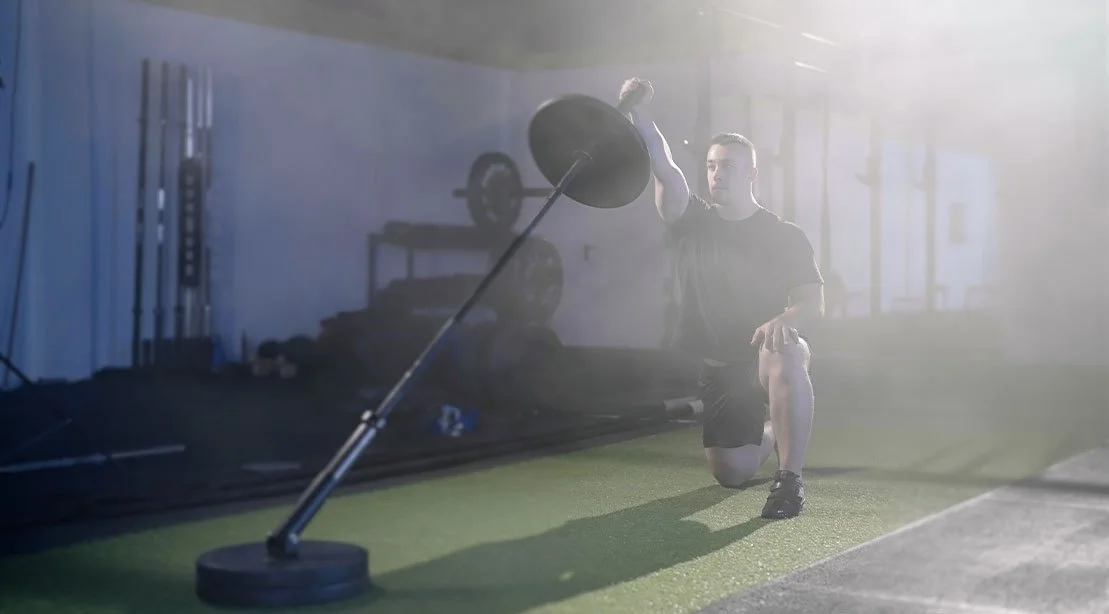
The half-kneeling landmine press is deceptively simple, yet nuances in setup can dictate your success. Executing this exercise with proper form can significantly enhance shoulder development, but many lifters overlook key details in their setup. Here’s a comprehensive guide on optimizing the half-kneeling press to ensure effective and safe lifts.
Step-by-Step Setup: Perfecting the Half-Kneeling Landmine Press
To maximize the benefits of your half-kneeling landmine press, focus on critical setup steps.
Determining Which Knee Goes Down
Choosing the knee to lower hinges on the arm you’re using for the press. For pressing with the right arm, you might place your left knee down (ipsilateral setup), or you could opt for the right knee down with the left foot forward (contralateral setup).
- Contralateral (Same-Side Knee Down): This method offers increased support from the back hip, enhancing mobility for the pressing shoulder.
- Ipsilateral (Opposite Knee Down): This setup introduces a diagonal force, challenging your stability while pressing.
Coach’s Insight: Start with the contralateral option. Once comfortable, explore the ipsilateral position to see which provides a stronger press without compensatory movements.
Establishing Your Stance
Next, refine your half-kneeling stance for optimal performance. Position your front foot flat with the ankle aligned under the knee and ensure your back knee sits beneath your hip; avoid allowing it to extend too far behind.
- Ensure your front knee remains aligned over your ankle.
- Keep your back knee under your hip to maintain alignment.
- Maintain sufficient lateral space between your front foot and back knee to resist unwanted rotation.
- Keep your hips level and facing forward, squeezing the glute on the down-knee side for stability.
Internal Cue: Imagine squeezing your glute. External Cue: Visualize turning your legs into parallel railroad tracks to enhance structure.
Selecting Your Grip
The grip on the barbell plays a pivotal role in your control. You can opt for various grips depending on factors such as hand size and comfort level.
- Cupped End-of-Bar Grip: Support the end of the barbell with your palm and wrap your fingers around the sleeve.
- Sleeve Grip: Envelop the sleeve itself, using your fingers to secure it at the end or wrap them around.
Regardless of your choice:
- Grip the bar firmly.
- Aim to keep your wrist neutral, with the forearm aligned.
- Select the grip providing the best stability and comfort.
Internal Cue: Imagine crushing the bar. External Cue: Picture your knuckles pointing toward the ceiling.
Finding Your Ideal Distance
Positioning relative to the landmine attachment is crucial. You want to be close enough to control the bar without awkward stretching while ensuring you’re far enough to keep an upright posture.
- Bring the bar end towards your working side shoulder.
- Maintain an upright position; avoid leaning into the bar.
- If you find yourself reaching, move closer; if you feel cramped, step back slightly.
Internal Cue: Allow your shoulder room to move. External Cue: Keep a visual of ribs stacked over hips.
Adjusting Your Press Position
Your elbow should nestle directly under and slightly in front of your hand to follow the natural path of the press. This positioning is vital for a solid and secured lift.
- Maintain your elbow below and slightly in front of your hand.
- Ensure a strong grip with the wrist stacked.
- Set your shoulder down gently without forcing it back.
- Keep your chest elevated throughout the motion.
Internal Cue: Focus on your shoulder down, chest elevated. External Cue: Visualize the trajectory of your barbell.
Engaging Before You Press
Before pressing, it's essential to create intra-abdominal pressure. This core engagement stabilizes your body and provides a solid base for the lift.
- Take a deep breath into your belly.
- Brace your abdomen for support.
- Keep your hips and shoulders aligned forward.
- Adhere to the ribs-over-hips alignment.
Internal Cue: Stay engaged and aligned. External Cue: Keep your zipper facing forward.
The Green Light Checklist
Before starting your set, check off these crucial elements:
- Knee position: Choose between ipsilateral or contralateral.
- Base width: Ensure sufficient lateral distance between feet for stability.
- Distance checked: Adjust until you’re upright and comfortably gripping the bar.
- Grip chosen: Secure the grip that offers comfort and stability.
- Bar position: The bar should sit slightly in front of your working shoulder with the elbow correctly aligned.
- Shoulder alignment: Keep your shoulder down, chest up.
- Rib position: Maintain rib cage alignment over hips.
- Core & Glute activation: Engage your glute and ensure core stability.
- Posture: Maintain squared shoulders and hips.
If all these factors are aligned, you’re ready to press.
Avoiding Common Setup Mistakes
Rushing through setup can lead to misalignment and wasted effort. Here are several pitfalls to watch for:
Kneeling Position Errors
Inappropriately close setups crowd your shoulder, complicating hand positioning. Conversely, being too far forces unnecessary reach.
- Solution: Take your time to fine-tune distance until your torso can stay tall with a comfortably positioned bar.
Grip Issues
Using a grip that doesn’t suit your hand size can lead to discomfort and unstable wrist positioning.
- Solution: Choose the grip that keeps your wrist neutral and secure.
Lower Back Alignment
Starting with an arched back can stem from poor setup proximity, exacerbating during the lift.
- Solution: Adjust distance again, maintaining rib alignment over hips while engaging your glutes.
Lack of Full-Body Tension
Neglecting to establish overall body tension leads to compromised lifts and diminished gains.
- Solution: Engage through the feet, core, hips, and grip before beginning the lift.
Final Thoughts Ahead of the Lift
While the half-kneeling landmine press may appear straightforward, neglecting setup intricacies can undermine your efforts. Proper positioning will enhance your performance and subsequently your strength gains. A methodical approach to refining your stance and technique pays dividends in your lifting journey, so is it worth it to invest this time? Absolutely.
Discussion
Sign in to join the discussion.